We Remove Vagrant Setup
· One min read

TL;DR We remove the Vagrant All-in-One Setup completely.
TL;DR We remove the Vagrant All-in-One Setup completely.

We are removing the ssh-scan ScanType With release 4.10.0. The ssh-scan ScanType was using the mozilla/ssh_scan project.
We already had the release scheduled for the next breaking release (v5.0.0), but we can't wait until then as the Docker Hub repository (docker.io/mozilla/ssh_scan) which contained the scanner was already deleted by either Mozilla or DockerHub.
This makes using the scanner in any version no longer possible.
If you were still using the ssh-scan ScanType, we recommend switching over to the newer ssh-audit which we added after the deprecation of the Mozilla ssh_scan project.
Cover photo by Bill Fairs on Unsplash.
Maybe you've heard from the shiny new CPUs from Apple: Silicon. Besides the good things (low power consumption, less fan noise) they have not so shiny drawbacks. One ran into is the problem of running containers built with/for x86 architecture. Yes, the problem itself is completely solved: Multi arch images. But, not every project builds them. No, I'm not looking at you DefectDojo 😉 BTW secureCodeBox provides multi arch images 🤗 So, I tinkered around with my Mac to get our secureCodeBox setup with DefectDojo up and running on Silicon Macs. Since there was not much help out there in the Internet I use this post to summarize the steps to get it run, for later reference.
I use Colima since roundabout a year now as drop in replacement for Docker Desktop. Works great. It was never necessary to read docs. It runs x86 images emulated via Qemu. But running single containers is not sufficient for secureCodeBox. Kubernetes is mandatory. Until now, I used Minikube, but it can't run x86 images on Silicon Macs. KIND also does not support them, as my colleagues told me. Some days ago, I told a friend about Colima, and he said: "Oh, nice. It can start a Kubernetes cluster."
Remember, I've never read the docs 😬 To install Colima and start a Kubernetes just execute (I assume you have Homebrew installed.):
brew install colima
colima start -f --kubernetes --arch x86_64
This will emulate an x86 vm under the hood. It is not virtualized as usual. This brings a performance penalty.
TL;DR: No, don't!
Brew offers very simple solution to start such services on login it. Just simply run brew services start colima and Colima will always start on login.
Never use brew services with sudo! This will break your Homebrew installation: You can't update anymore without hassle. The reason for that: Homebrew assumes that it is always executed in the context of an unprivileged user. If you run brew services with sudo files wil be written with "root" as owner. Since Homebrew always runs with your unprivileged user it can't modify such files anymore. Been there, done that. Its no good!
The "problem" with brew services ia, that it always uses the LaunchAgents plist-File from the brew. For Colima this means that brew services start colima always copies the file from the Homebrew's Formula to ~/Library/LaunchAgents/homebrew.mxcl.colima.plist. But since this LaunchAgents definition invokes colima without the arguments --kubernetes and --arch x86_64 you need to modify it:
...
<key>ProgramArguments</key>
<array>
    <string>/opt/homebrew/opt/colima/bin/colima</string>
    <string>start</string>
    <string>-f</string>
</array>
...
If you modify this file and restart the daemon via brew services your changes will be lost! And this is by design.
You have two options:
colima start --kubernetes --arch x86_64 or<?xml version="1.0" encoding="UTF-8"?>
<!DOCTYPE plist PUBLIC "-//Apple//DTD PLIST 1.0//EN" "http://www.apple.com/DTDs/PropertyList-1.0.dtd">
<plist version="1.0">
<dict>
<key>EnvironmentVariables</key>
<dict>
<key>PATH</key>
<string>/opt/homebrew/bin:/opt/homebrew/sbin:/usr/bin:/bin:/usr/sbin:/sbin</string>
</dict>
<key>KeepAlive</key>
<dict>
<key>SuccessfulExit</key>
<true/>
</dict>
<key>Label</key>
<string>de.weltraumschaf.colima</string>
<key>LimitLoadToSessionType</key>
<array>
<string>Aqua</string>
<string>Background</string>
<string>LoginWindow</string>
<string>StandardIO</string>
</array>
<key>ProgramArguments</key>
<array>
<string>/opt/homebrew/opt/colima/bin/colima</string>
<string>start</string>
<string>-f</string>
<string>--kubernetes</string>
<string>--arch</string>
<string>x86_64</string>
</array>
<key>RunAtLoad</key>
<true/>
<key>StandardErrorPath</key>
<string>/opt/homebrew/var/log/colima.log</string>
<key>StandardOutPath</key>
<string>/opt/homebrew/var/log/colima.log</string>
<key>WorkingDirectory</key>
<string>/Users/sst</string>
</dict>
</plist>
And store it in the file ~/Library/LaunchAgents/de.weltraumschaf.colima.plist. Obviously, change "de.weltraumschaf" to whatever you like. Instead of Homebrew, now you need to use launchctl to interact with the LaunchAgent.
The rest is straight forward. To install secureCodeBox simply execute (as documented here):
helm --namespace securecodebox-system \
    upgrade \
    --install \
    --create-namespace \
    securecodebox-operator \
    oci://ghcr.io/securecodebox/helm/operator
Then install the scanners you want, e.g. Nmap:
helm install nmap oci://ghcr.io/securecodebox/helm/nmap
kubectl get scantypes
To install DefectDojo the easiest way is to clone their repo and install from it (as documented here):
git clone https://github.com/DefectDojo/django-DefectDojo
cd django-DefectDojo

helm repo add bitnami https://charts.bitnami.com/bitnami
helm repo update
helm dependency update ./helm/defectdojo

helm upgrade --install \
  defectdojo \
  ./helm/defectdojo \
  --set django.ingress.enabled=true \
  --set django.ingress.activateTLS=false \
  --set createSecret=true \
  --set createRabbitMqSecret=true \
  --set createRedisSecret=true \
  --set createMysqlSecret=true \
  --set createPostgresqlSecret=true \
  --set host="defectdojo.default.svc.cluster.local" \
  --set "alternativeHosts={localhost}"
Get DefectDojo admin user password:
echo "DefectDojo admin password: $(kubectl \
      get secret defectdojo \
      --namespace=default \
      --output jsonpath='{.data.DD_ADMIN_PASSWORD}' \
      | base64 --decode)"
Finally forward port to service:
kubectl port-forward svc/defectdojo-django 8080:80 -n default
Now you can visit the DefectDojo web UI at http://localhost:8080.


Hey there, I’m Thibaut Batale, and I’m thrilled to share my experience as a Google Summer of Code contributor with OWASP secureCodeBox. Being selected to participate in this program was a unique opportunity, but what excited me the most was being chosen for the very first project I applied to. I wanted to spend this summer battling with Kubernetes, and I got exactly what I wished for—and more.
If you’re curious about my contributions during GSoC 2024, you can check out my Pull Requests on GitHub. You can also find more details about my project by visiting the Project link.
Imagine this scenario: You want to assess your security environment by testing for various vulnerabilities. With secureCodeBox, you can launch multiple security tests. However, traditionally, you would first need to create a YAML file defining the scan parameters and then use the kubectl command to apply that file. This process can be tedious and time-consuming, especially if you’re managing multiple scans.
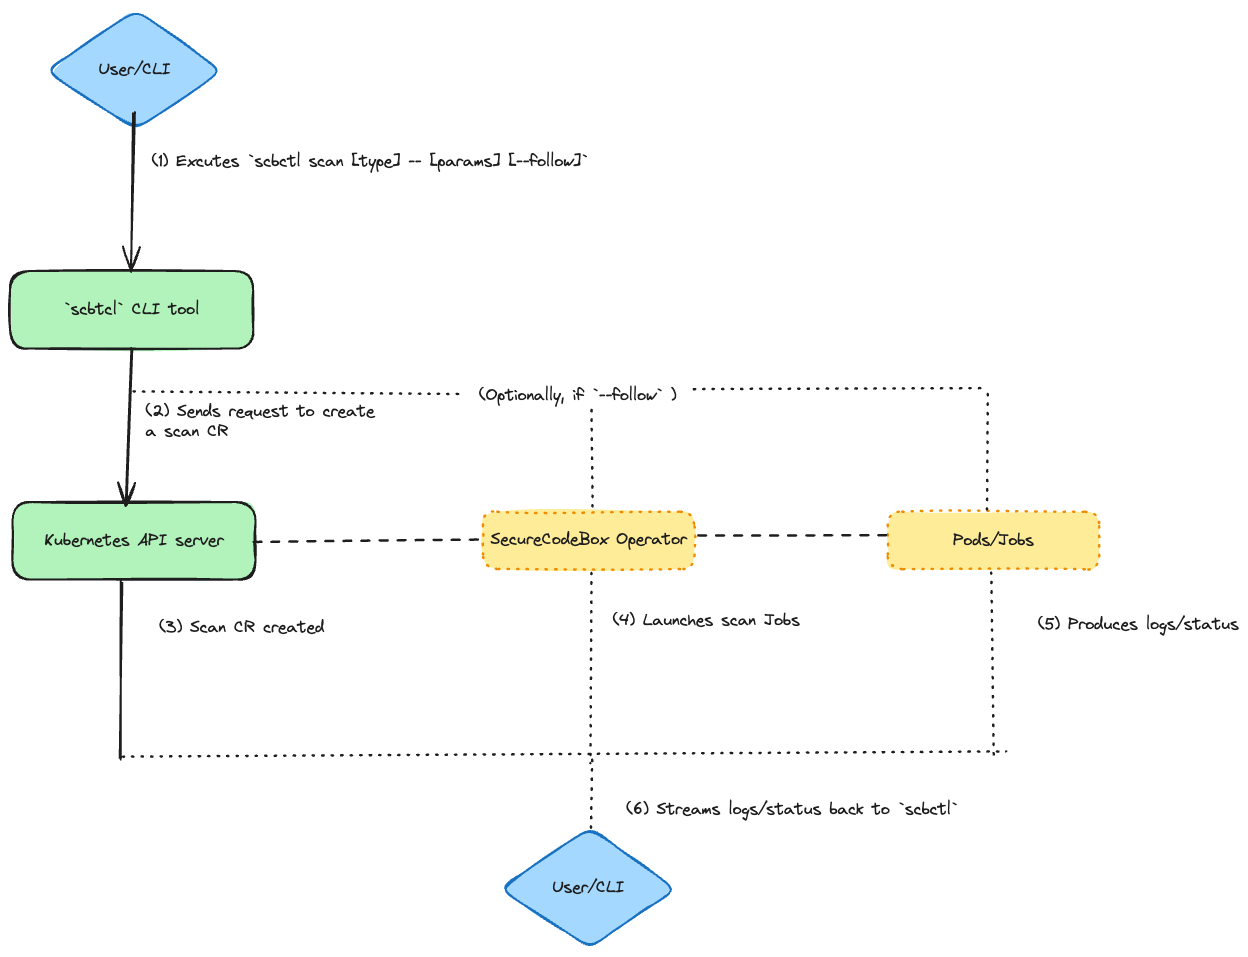
This is where the scbctl CLI comes in. By providing a set of commands that interact directly with the secureCodeBox operator, the CLI tool simplifies and streamlines the process of managing security scans, making it more efficient and user-friendly.
During the summer, I focused on two main goals: implementing the new commands and adding unit tests to ensure their reliability.
The commands implementation essential follows this workflow
 .
.
scbctl scan)The scbctl scan command was designed to simplify the initiation of new security scans. Instead of manually creating a YAML file and applying it with kubectl, users can now start a scan directly from their terminal. This command interacts with the secureCodeBox operator by creating a Scan custom resource (CR) in the specified namespace. The operator then processes this CR, triggering the appropriate scanner to run the specified tests.
Usage Example:
scbctl scan nmap -- scanme.nmap.org
This command creates a new Nmap scan targeting scanme.nmap.org.
Output:
🆕 Creating a new scan with name 'nmap' and parameters 'scanme.nmap.org'
🚀 Successfully created a new Scan 'nmap'
scbctl scan --follow)The --follow flag enhances the scbctl scan command by providing real-time feedback on the progress of a scan. Once a scan is initiated, users can observe its progress directly from their terminal. This feature interacts with the secureCodeBox operator by streaming logs from the Kubernetes Job and Pods associated with the scan, giving users visibility into the scan’s status and results as they happen.
Usage Example:
scbctl scan nmap --follow -- scanme.nmap.org
This command initiates a scan and follows its progress in real-time.
Output:
Found 1 job(s)
Job: scan-nmap-jzmtq, Labels: map[securecodebox.io/job-type:scanner]
scan-nmap-jzmtq📡 Streaming logs for job 'scan-nmap-jzmtq' and container 'nmap'
Starting Nmap 7.95 ( https://nmap.org ) at 2024-08-23 11:59 UTC
Nmap scan report for scanme.nmap.org (45.33.32.156)
Host is up (0.33s latency).
Other addresses for scanme.nmap.org (not scanned): 2600:3c01::f03c:91ff:fe18:bb2f
Not shown: 996 closed tcp ports (conn-refused)
PORT      STATE    SERVICE
22/tcp    open     ssh
80/tcp    filtered http
9929/tcp  open     nping-echo
31337/tcp open     Elite

Nmap done: 1 IP address (1 host up) scanned in 30.19 seconds
scbctl trigger)The scbctl trigger command allows users to manually trigger a ScheduledScan resource. Scheduled scans are designed to run at predefined intervals, but there are times when an immediate execution is required. This command interacts with the secureCodeBox operator by invoking the ScheduledScan resource and creating a new Scan based on the schedule’s configuration.
Usage Example:
scbctl trigger nmap --namespace foobar
This command triggers the nmap scheduled scan immediately.
Output:
triggered new Scan for ScheduledScan 'nmap'
scbctl cascade)The scbctl cascade command provides a visualization of cascading scans—scans that are automatically triggered based on the results of a previous scan. This command interacts with the secureCodeBox operator by querying all Scan resources in a given namespace and identifying relationships based on the ParentScanAnnotation. It then generates a hierarchical tree that visually represents these cascading relationships.
Usage Example:
scbctl cascade
This command visualizes the cascading relationships between scans in the current namespace.
Output:
Scans
├── initial-nmap-scan
│   ├── follow-up-vulnerability-scan
│   │   └── detailed-sql-injection-scan
└── another-initial-scan
    └── another-follow-up-scan
Testing was a crucial part of the development process, especially considering the complexity of the CLI commands and their interactions with the secureCodeBox (SCB) operator. Achieving an overall test coverage of 78% involved writing extensive unit tests that validated the behavior of each command and ensured they interacted correctly with the Kubernetes resources.
To simulate the Kubernetes environment and test the SCB commands without deploying them on an actual cluster, I used the fake.Client from the controller-runtime library. This allowed me to create a mock client that mimicked the behavior of the Kubernetes API, enabling thorough testing of the command interactions.
Here’s an example of a test case for the scbctl scan command:
testcases := []testcase{
    {
        name:          "Should create nmap scan with a single parameter",
        args:          []string{"scan", "nmap", "--", "scanme.nmap.org"},
        expectedError: nil,
        expectedScan: &expectedScan{
            name:       "nmap",
            scanType:   "nmap",
            namespace:  "default",
            parameters: []string{"scanme.nmap.org"},
        },
    },
    // Additional test cases...
}
In this test, I defined different scenarios to validate the command's behavior. Each test case included the expected arguments, any expected errors, and the expected state of the scan resource after execution.
The tests focused on validating that the CLI commands correctly created the necessary Kubernetes resources, such as Scan objects. For example, the scbctl scan command was tested to ensure it created a scan with the correct type, parameters, and namespace:
if tc.expectedScan != nil {
    scans := &v1.ScanList{}
    listErr := client.List(context.Background(), scans)
    assert.Nil(t, listErr, "failed to list scans")
    assert.Len(t, scans.Items, 1, "expected 1 scan to be created")

    scan := scans.Items[0]
    assert.Equal(t, tc.expectedScan.name, scan.Name)
    assert.Equal(t, tc.expectedScan.namespace, scan.Namespace)
    assert.Equal(t, tc.expectedScan.scanType, scan.Spec.ScanType)
    assert.Equal(t, tc.expectedScan.parameters, scan.Spec.Parameters)
}
This code snippet checks that the correct Scan object was created in the Kubernetes cluster, verifying that the CLI command worked as intended.
By running these tests and implementing these scenarios, I ensured that the scbctl tool behaved as expected under various conditions, contributing to the robustness of the secureCodeBox CLI tool.
This summer wasn’t without its challenges. Balancing time became difficult when my school resumed, and I encountered several technical hurdles along the way. The most notable was implementing the --follow flag. Initially, we used the controller-runtime, but it lacked the necessary support for streaming logs. We considered switching to the go-client, but it introduced inconsistencies that could delay the project. After extensive discussions with my mentor Jannik Hollenbach, we decided to defer this feature for future implementation. This experience taught me the importance of thorough research and adaptability in problem-solving.
One of the most rewarding aspects of working on this project was the continuous learning curve. Whether diving into the complexities of the codebase or exploring the broader capabilities of secureCodeBox, there was always something new to discover. This constant evolution is what made the project so fascinating for me.
As the project reaches completion, maintaining and building upon these efforts is crucial. Looking ahead, I plan to focus on integrating monitoring features using the controller-runtime whenever its available, which will enhance the tool's ability to provide real-time feedback. Additionally, I aim to refine existing commands, particularly the cascade command, by adding flags to display the status of each scanner. This will provide users with more detailed insights into their scans. My commitment to improving and maintaining the project will ensure its continued success and relevance in the future.
With the secureCodeBox 4.6.0 release, we are transitioning our installation instructions from the old https://charts.securecodebox.io Helm registry to the new Helm registry infrastructure, which uses Open Container Initiative (OCI) images to store charts.
https://charts.securecodebox.io) will be deprecated with secureCodeBox 4.6.0 and will be shut down at the end of the year.You'll need to switch the source of your Helm charts to point to the OCI registry. This process is straightforward.
When using Helm via the CLI/CI:
# Before
helm --namespace securecodebox-system install securecodebox-operator secureCodeBox/operator

# After
helm --namespace securecodebox-system install securecodebox-operator oci://ghcr.io/securecodebox/helm/operator
Existing releases that have been installed using the charts.securecodebox.io registry can be switched easily:
# Prior installation:
helm upgrade --install nmap secureCodeBox/nmap --version 4.5.0

# To switch the same Helm release to OCI, simply install the release with the same name from OCI:
helm upgrade --install nmap oci://ghcr.io/securecodebox/helm/nmap --version 4.5.0
Both ArgoCD and Flux also support OCI Helm charts.
https://charts.securecodebox.io registry is the only component we need to self-host to provide secureCodeBox to the internet. There have been issues and downtime before, which we’d like to avoid in the future by having the charts hosted for us by the GitHub container registry.index.yaml file and the zipped Helm charts). We have migrated to a cheaper setup, but it has cost us some money in the past.

Cover photo by Look Up Look Down Photography on Unsplash.
This is part two of the SBOM story which covers the consuming side. If you missed part one, you can find it here.
One would assume that with a standardized format the combinations of generator and consumer are interchangeable, but as noted previously, the SBOMs still vary in content and attributes.


 Cover photo by @possessedphotography on Unsplash.
The OWASP Zed Attack Proxy (ZAP) can be a powerful tool for pentesters and AppSec testing. However, some of its functionality can be a bit hard to wrap your head around at first. In this post, we will describe how to use one of the more powerful features of the software: Authentication and session management. First, we will show you how to develop an authentication script for a new, previously-unsupported authentication scheme, using the graphical ZAP interface. Afterwards, we will dive into how the same can be achieved inside the secureCodeBox using the newly-supported ZAP Automation Framework.

Cover photo by Mike Lewis HeadSmart Media on Unsplash.
In the previous blogpost we described how to use scans to find infrastructure affected by Log4Shell, but wouldn't it be way more convenient to already have this information available? SBOMs promise to offer that convenience of only having to look up, where an affected dependency is used, and immediately being able to mitigate it. This blog post details our plans to integrate an SBOM creation workflow into the secureCodeBox and our troubles with using different tools for it.


Cover photo by Ray Shrewsberry on Unsplash.
By now, you must have heard about Log4Shell, the present that ruined Christmas for many developers and IT specialists, whether naughty or nice. This blog describes how we used the secureCodeBox as one building block in our incident response process at iteratec.